Taming unruly frizz and achieving a perfect, natural hold doesn't have to come with a hefty price tag or a list of unpronounceable ingredients. For decades, individuals seeking a purer approach to personal care have turned to the simple magic of homemade solutions. Imagine a hair gel that not only keeps your locks in place but also nourishes them, all while being incredibly affordable and easy to make right in your kitchen. This is precisely what you get with a diy lemon hair gel – a time-tested secret for effortless frizz control and beautiful, healthy hair.
The journey towards natural beauty often begins with scrutinizing what we put *on* our bodies, just as much as what we put *in* them. Long before "clean beauty" became a mainstream trend, some pioneering individuals recognized the need for natural alternatives. In a time when organic options were scarce, creativity flourished, leading to ingenious DIY solutions. One such creation, a gelatin-based hair gel, has stood the test of time, proving its efficacy for generations. While many popular flaxseed gels offer a good hold, their often messy preparation can be a deterrent for those seeking convenience. That's where the elegance and simplicity of a gelatin-based, homemade hair gel shines, particularly when infused with the refreshing essence of lemon.
Why Embrace DIY Lemon Hair Gel? Unlocking Natural Hair Health and Hold
Switching to a diy lemon hair gel offers a multitude of benefits that extend far beyond just styling. It's a holistic approach to hair care that prioritizes health, affordability, and customization, making it a superior choice compared to many commercial products.
The Toxic Truth About Commercial Gels
Many store-bought hair gels, while offering a quick fix for styling, often contain a cocktail of synthetic chemicals that can be detrimental to your hair and scalp over time. One of the most common culprits is alcohol. While it might appear to help soften hair and thin out the formula initially, alcohol is a known dehydrator. It rapidly evaporates, stripping your hair follicles of their vital natural oils, leading to dryness, brittleness, and weakened strands in the long run. Other common additives like parabens, phthalates, and synthetic fragrances can contribute to scalp irritation and other health concerns. By choosing to make your own diy lemon hair gel, you actively eliminate these harsh chemicals, safeguarding your hair's natural moisture and integrity.
Affordable Frizz Control, Naturally
One of the most compelling reasons to make your own hair gel is the incredible cost savings. While premium natural hair products can be expensive, the ingredients for a homemade version cost mere pennies per batch. This makes daily frizz control and styling an accessible luxury, rather than an ongoing expense. For those with curly or wavy hair, frizz can be an almost daily battle, making a cost-effective solution invaluable. Imagine effortlessly taming those flyaways and defining your style without worrying about the product running out or breaking the bank. This economic advantage ensures you can always have a fresh supply of your favorite gelatin hair gel for natural, firm curls or sleek straight styles.
Tailored for Every Hair Type
Whether you have bouncy curls, sleek straight hair, or gentle waves, diy lemon hair gel offers adaptable hold. Unlike some commercial gels that can leave straight hair feeling stiff or curly hair crunchy, this natural alternative provides a flexible yet firm hold that works harmoniously with your hair's natural texture. Its versatility means it can be your go-to product for a variety of styles, from defining ringlets to smoothing down updos, or simply adding a touch of polish to an everyday look.
Beyond Hold: Nourishing Benefits of Lemon and Gelatin
The power of this homemade gel isn't just about styling; it's also about nourishing your hair. Gelatin, a protein derived from collagen, can contribute to stronger, healthier hair by coating the strands and providing a protective barrier. Lemon juice, on the other hand, is a natural source of vitamin C and has a slightly acidic pH, which can help to smooth the hair cuticles, enhancing shine and reducing frizz. It also leaves behind a wonderfully fresh and clean scent, making your hair not only look good but smell great too.
The Simple Science Behind Your Homemade Lemon Hair Gel
At the heart of this effective natural styling solution are two humble, yet powerful, ingredients: gelatin and lemon. Understanding how they work together reveals the genius of this DIY approach.
Gelatin: Nature's Styling Polymer
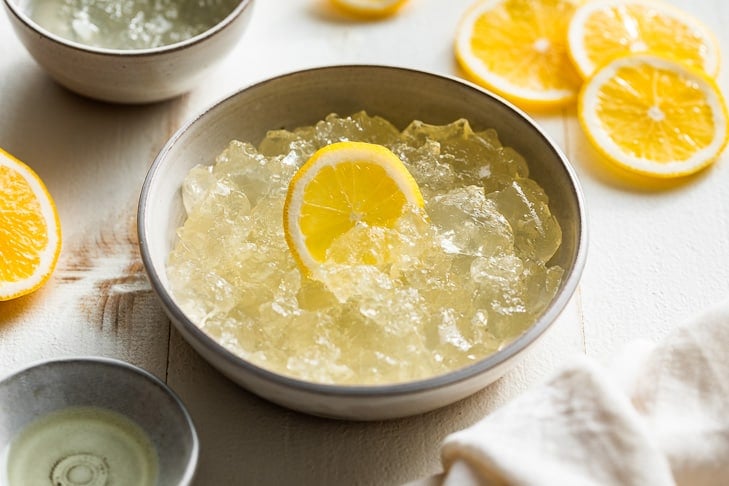
Gelatin acts as the primary holding agent in this DIY hair gel. When dissolved in warm water and then cooled, gelatin forms a flexible, semi-solid matrix. This protein-rich structure coats each hair strand, providing natural support, definition, and hold without the stiffness or residue often associated with synthetic polymers. It essentially gives your hair a gentle, invisible scaffolding. The quality of your gelatin can impact the final product's consistency and shelf life. While standard brands like Knox work, many long-time users recommend a high-quality, grass-fed gelatin, such as Great Lakes brand, for superior stability and a longer-lasting product. Through extensive testing, it's been found that higher quality gelatin tends to yield a more robust gel that maintains its integrity for longer periods.
Lemon: More Than Just a Scent
The addition of lemon juice to your homemade hair gel is not merely for its refreshing fragrance, though that is a delightful bonus. Lemon juice's natural acidity (citric acid) plays a crucial role in hair health. It helps to flatten and seal the hair cuticle, the outermost layer of your hair. When cuticles are smooth, hair appears shinier, feels softer, and is less prone to frizz as it creates a barrier against humidity. Furthermore, lemon is known for its natural clarifying properties, which can help remove product buildup and invigorate the scalp. For those who prefer a different aroma or wish to avoid the slight lightening effect lemon can have on some hair types (especially when exposed to sun), pure essential oils like lavender, rosemary, or peppermint can be wonderful alternatives, adding their own unique benefits and captivating scents.
Crafting Your Own DIY Lemon Hair Gel: The Ultimate Recipe & Variations
Making your own diy lemon hair gel is surprisingly simple and requires minimal time and effort. Here's how to create your basic batch, along with ideas for customization.
The Core Recipe: Step-by-Step Guide
This foundational recipe forms the basis of your natural frizz-controlling gel. It's incredibly cost-effective, often costing just pennies to produce, making it a guilt-free indulgence.
Ingredients:
- 1 teaspoon (or more, for firmer hold) unflavored gelatin (preferably high-quality, grass-fed)
- 1 cup hot water (not boiling)
- 1-2 tablespoons fresh lemon juice (or 5-10 drops of your favorite essential oil)
Instructions:
- Prepare the Gelatin: In a small saucepan, combine the gelatin and hot water over low heat. Alternatively, you can heat water separately until it's hot but not boiling, then pour it over the gelatin in a heat-safe bowl.
- Dissolve Thoroughly: Stir the mixture continuously until the gelatin is completely dissolved. Ensure there are no lumps. This is crucial for a smooth, consistent gel.
- Add Lemon (or Essential Oil): Remove the mixture from the heat. Stir in the fresh lemon juice. If you're opting for essential oils instead, wait for the mixture to cool slightly before adding them, as high heat can diminish their therapeutic properties.
- Cool and Store: Allow the mixture to cool completely at room temperature. As it cools, it will begin to thicken into a gel. Once cool, carefully pour the gel into clean, sealable containers or small squeeze bottles using a funnel for ease.
- Refrigerate: Store any portion you won't use within a week in the refrigerator. This significantly extends its shelf life, keeping it fresh for several weeks. At room temperature, it typically lasts about a week.
Customizing Your Hold and Hydration
One of the greatest advantages of a diy lemon hair gel is its adaptability. You can easily tweak the recipe to suit your specific hair needs and preferences.
- Lighter vs. Firmer Hold: The key to adjusting hold is the gelatin-to-water ratio. For a lighter, more flexible hold, start with less gelatin (e.g., ½ to ¾ teaspoon per cup of water). For a super-firm hold, you can increase the gelatin to 1.5 or even 2 teaspoons per cup. Experiment to find your perfect balance!
- Moisturizing Boosts: To add extra hydration, especially if you have dry or coarse hair, consider stirring in a few drops of a nourishing oil like argan oil, jojoba oil, or sweet almond oil after the mixture has cooled slightly. A teaspoon of aloe vera gel can also boost moisture and soothe the scalp.
- Essential Oil Swaps: While lemon offers a bright, clean scent, feel free to swap it for other essential oils. Lavender is calming and great for scalp health, rosemary can stimulate hair growth, and peppermint provides a refreshing tingle. Always ensure essential oils are high-quality and safe for topical use.
Expert Tips for Longevity and Flawless Application
To get the most out of your homemade creation, a few pro tips can make all the difference, ensuring your diy lemon hair gel stays fresh and performs optimally.
Maximizing Shelf Life
Proper storage is paramount for extending the life of your natural hair gel. Keeping it refrigerated is the best practice, as it significantly inhibits bacterial growth. Always use clean containers and try to avoid dipping your fingers directly into the main batch, especially if you plan to keep it for several weeks. Squeeze bottles are ideal for this purpose, as they minimize contamination and allow for precise application. If you notice any unusual smell, discoloration, or mold, it's a clear sign that the gel has spoiled and should be discarded. Since it's so inexpensive to make, replacing a batch is never a hassle.
Application Techniques for Smooth Results
Applying your diy lemon hair gel effectively can enhance its frizz-controlling and styling power. For best results, apply it to damp, towel-dried hair. Start with a small amount – you can always add more if needed. Distribute the gel evenly throughout your hair using your fingers or a wide-tooth comb. If you have curly hair, gently scrunch your curls to encourage definition. For straight hair, smooth it down to tame flyaways or apply at the roots for a bit of lift. Using a small funnel when pouring the mixture into squeeze bottles can prevent spills and make the transfer process much cleaner and easier.
Troubleshooting Common DIY Gel Issues
- Too Stiff: If your gel turns out too firm, you can gently reheat it over very low heat, add a tiny bit more water, stir, and then re-cool. Next time, use less gelatin.
- Too Runny: If your gel isn't holding enough, gently reheat it and dissolve a tiny bit more gelatin into the mixture, then cool again.
- Goes Bad Quickly: Ensure your water is hot enough to fully dissolve the gelatin (which helps sanitize it), use clean containers, and always refrigerate what you don't use immediately. Quality gelatin also plays a role in shelf life.
Embracing a diy lemon hair gel is more than just making a product; it's a commitment to healthier hair, a simpler routine, and a more sustainable lifestyle. It’s a testament to the fact that effective, high-quality hair care doesn't need to be complicated or expensive. By opting for this natural, homemade solution, you’re not only gaining impeccable frizz control and a reliable hold, but you’re also nourishing your hair with wholesome ingredients, free from harsh chemicals. Give this age-old secret a try, and discover the refreshing difference it can make for your hair.
